
This stamp set and its coordinating thinlits are so versatile and so much fun to work with. The possibilities are endless!!
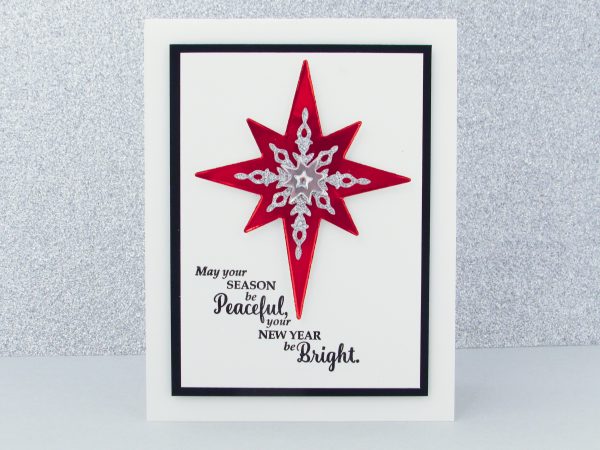
With its red cardstock, silver glimmer paper snowflake, silver foil star and finished with a silver enamel star this card is sure to create a “WOW!”
Of course, you can play with colors, cardstocks and speciality papers to create the perfect star or snowflake, that suites you.
Thanks for stopping by!! Blessings, Brandy
Base
1.Cut 4-1/4″ x 11″ piece of whisper white cardstock and fold it in half. This is your base.
2. Cut a 4-3/4″ x 3-1/4″ piece of basic black cardstock.
Tip: Use stampin dimensionals to pop this piece of cardstock up off your base.
3. Cut a 4-1/2″ x 3″ piece of whisper white cardstock to layer on top of your basic black cardstock.
Tip: Typically, I would stamp this piece first; however, I wanted to be sure I stamped it around the star. I felt on this card, it was just as easy to place my star and then stamp my sentiment. Another option would be to place your star down and place it where you’d like it and then stamp around it.
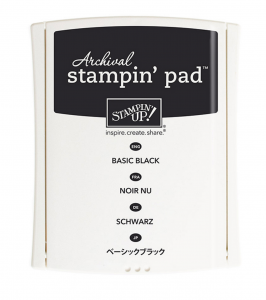
4. Using a StazOn or Archival Black Stamp Pad to add your sentiment on the front of your card!
Star
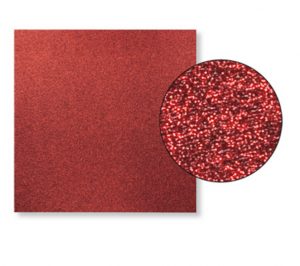
Red Glimmer Paper
Item #121790, p.175
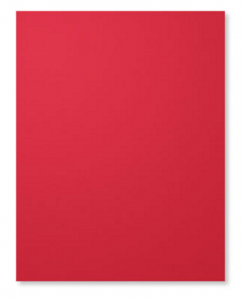
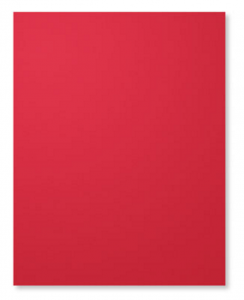
Real Red Cardstock
Item #102482, p.171
1. Cut your real red cardstock or glimmer paper star out with your starlight thinlits die and with a stampin dimensional pop it up off your card base.
Tip: With this die you want to use your multipurpose platform or your magnetic platforms only.
2. Cut out your intricate star using the starlight thinlits die.
Tip: To cut this intricate star, you’ll want to use the precision base plate along with your die brush.
3. Cut your silver foil star using your multipurpose platform or your magnetic platforms only.
4. Lastly, add your silver enamel star.
Products Used
Star of Light Stamp Set
Item #142110, p. 9 (Holiday Catalog)
Available Sept. 1
Starlight Thinlits Dies
Item #141840, p. 9 (Holiday Catalog)
Available Sept. 1
BUNDLE & SAVE
p. 9 (Holiday Catalog)
Item #143508,


Catalog Request Form
If you are interested in receiving a Stampin’ Up catalog, please fill out the request form below. If you currently have a demonstrator, please ask your current demonstrator for the catalog, because I do have to pay for the catalogs and for shipping. However, if you don’t have a demonstrator and are interested in purchasing Stampin' Up products, I’d love the opportunity to share Stampin’ Up with you, answer any questions and earn your business.


Beautiful card and your video cobtained several very helpful tips. I wondered if I can get one if those large SU. Grid pads you use? Dent see it in cstaog? Thank you for the tutorial. Will be subscribing to your site.
Brandy, I love this card. I needed inspiration for this set. I’ve seen so many, but your just did it for me. Sad about the red foil, I wish Stampin’ Up! would carry it all the time. Would be great at both Christmas, and Valentines…so why not just sell it always – right!!! I also saw the die laying right in front of you too, but I know I’ve looked right at something and not seen it either. Hey, in the video you mentioned you were going to post another card using the Star of Light using Tempting Turquoise I believe. When might you get that posted, I’m anxious to see that one too?
Brandy,
This card is one of the most beautiful cards that I have seen. I ordered the bundle and can’t wait for it to arrive! Now to get the precision base plate…
Hi Brandy – I just want to thank you for your incredibly fast service in getting catalogs to me. Now the hard part – figuring out what I can afford to order. Thanks so much!
Thanks so much Brandy. Simply beautiful!
Nina
Love it!! You make it look so easy to do so many at once!
Loved the 10 in 20 card and especially loved your video tutorial! Your videos are so easy to follow, well explained, and easy to see. Thanks; I always look forward to opening an email from you; I know it is going to be something good.
As always: an absolutely marvelous video and so much detailed information. I have trouble figuring out what to put inside the cards. I wonder if you would consider suggestions on some of your future videos. I can put something as simple as Happy Birthday or Merry Christmas, etc. but that seems so impersonal and unimaginative….whoops, guess that’s what I am as I can’t get creative enough to put something else. Thanks again for taking the time with the videos.
Hi Brandy
I absolutely love this card. It makes me wish I didn’t already have my cards made for this Christmas. Oh well, I can always get a jump on next year. Thanks for the video and have a great year.
Does this card require additional postage when mailing? I am curious because of the depth when multiple layers are popped up with dimensionals and the metallic enamel shape.
Hi Janice,
Good Morning!! Ya know, I don’t believe this card would need extra postage. I have already started sending them to my customers for last months orders. I haven’t had a problem thus far. With that said, sometime the postman from location to location might request more postage. I typically pay more with rhinestones. With enamel dots they are flat and smooth and I typically have no problems. I hope that helps.
Have a great day!! Brandy
Love it !!!!! Very classy. And to think, making 10 in 20. FABULOUS.
Hi Lori,
Awww.. Thank you so much for the kind note. I love making cards for my customers and friends and this is the easiest way for me to do it in a timely manner. Lol!!! Thanks for stopping by. Have a Blessed Day!! Brandy
Awesome card!!! Can’t wait till Sept.1…. The new holiday cattie might just be the best one yet….oh, how I’ll need to pace myself…lol!!!
Will you be showing us this card that you did in turquoise?? Love all of your videos…they are so professional!!!!
HI Gloria,
Thank you for the sweet note. Yes, we are all super excited about the Holiday Catalog. Its FANTASTIC this year!!! Very, Very good and I honestly struggle staying focused because there are so many great items to purchase and play with. Lol!!! Absolutely, I will for sure share the Turquoise one. Its beautiful and its mostly stamping without additional products needed. I think its important to show variation. Thank you for stopping by. Have a Wonderful Day!! Hugs, Brandy
I was so excited to see in my e-mail that you had a new video. I love to watch you and have always been inspired by your creations. I also am wondering where to get the red foil paper that you used. Beautiful card. Thanks for the Holiday catalog. I have all my “must haves” marked and can’t wait till September 1 to order them. Keep the videos coming.
Hi Diane,
Eek!!! Funny thing… I posted this video and began working on my website and tutorial. It was then I realized that Stampin Up no longer sells the red foil paper. My bad… I do apologize; however, good news there is always a way to improvise. As I thought about it… you might consider Red Glimmer Paper? It would sparkle beautifully and give it a gorgeous pop. Thank you for stopping by and for giving me the opportunity to help you and continue to earn your business. Have a Blessed Day!! Brandy
Beautiful card Brandy, always an inspiration, thank you for sharing.
Oh by the way, I was sitting here showing you where the die was, I was pointing at it in front of you, done that many many times 🙂
Hi Chris,
Lol!!! That’s too funny!!! I was like “where did it go”… too funny. The worst part is it happens to me all the time. Good thing… you helped me find it!!! Thank you SO MUCH for stopping by and for your kind note. I always love hearing from you. Have a Wonderful Day!! Hugs, Brandy
Hi Brandy, Your card today was absolutely beautiful. Thanks for the great tutorial.
Hi Anna,
Good Morning!
Thank you SO MUCH for stopping by and for your kind comment. I’m so excited to know that you enjoyed my project and tutorial. Thanks for making my day!!
Stay in touch and have a Great Day!!
Hugs, Brandy
Love it. You always do such beautiful cards.. I LOVE the red foil. I want to get red foil so do I need to look for a certain kind? Thanks.
Hi Brandy
What a lovely card. I really love the stamp set sentiments. Thank you for showing us your techniques. Take Care…
Love this!! Smart idea adding the Precision Plat how to video too. I wished I watched that video before using it. LOL
Hi Eileen,
Good Afternoon!!! Thank you friend for the kind note and for enjoying my project and tutorial. Yay!!! Thank you. Funny thing… I learned my lesson by not watching these how to videos. Lol!! I will not go into details but I now make sure I watch the SU Videos for tips. Sending You Hugs and Love across the miles!! Miss you!! Blessings, Brandy
Brandy, your Star of Light Christmas card design is beautiful. I am wondering what size you cut your red paper for the stars, or, in other words, how many red stars you got out of a 12 x 12 paper, to calculate how much red glimmer paper I would need to make the quantity of cards I typically send out at Christmas time. Hope to see a lot more videos from you soon!
Hi Cynthia,
Thank you SO MUCH for stopping by and for your kind note. Thank you for enjoying my project and tutorial. Yay!!! Eek!! That’s a tough questions. Ya know, I used all my foil paper so I don’t honestly know how many I was able to get out of the sheet. With that said, the paper measures 12 x 12 and the Star Framelit (Red Large Star) Measures 4″ x 3-1/2″. I hope that helps and will remember to write that down next time. Thanks again for stopping boy. Let me know if you need something or have further questions. I’m happy to help. Blessings, Brandy