


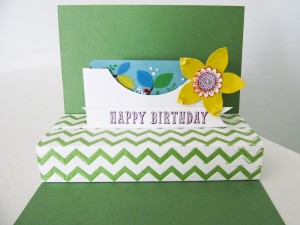
The most exciting part about this card is the fun surprise on the inside… a gift card holder. Yay!
Directions:
1. Cut a 8-1/2″ x 5-1/2″ piece of Wild Wasabi Cardstock and fold in half. This is your base.
2. Cut a 2-3/4″ x 5-1/2″ piece of Whisper White Card stock for the front of your card.
3. You’ll also need to cut (2) 4″ x 5-1/2″ piece of Whisper White Cardstock for the inside of the card.
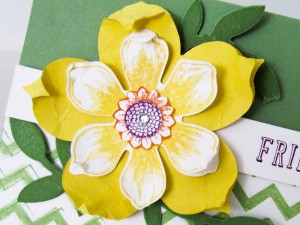
4. Next cut out your large Daffodil Delight flower from the Flower Frenzy Bigz Die.
Tip: The inside flower is also from the Flower Frenzy Bigz Die and you can cut them out at the same time.
5. Don’t forget to cut out your Wild Wasabit leaves using the Flower Frenzy Bigz Die.
Tip: This card uses a brayer for the Chevron Pattern. To color your leaves your going to ink up your brayer with Wild Wasabi ink and run it over your leaves. This will tint them a shade darker so they pop off your card.
6. If you want a decorative strip across the front you’ll need to cut a 1″ x 5-1/2″ piece of Whisper White Cardstock.
 Tip: The “Friends” on the front of the card and the “Happy Birthday” on the inside are both stamped in Blackberry Bliss and they are from the Stampin’ Up! Peace Love and Cupcake stamp set on page 53.
Flower:
1. Once you have cut out the Daffodil Delight flower using the Big Shot and your Flower Frenzy Bigz die… you’ll want to give it a bit of texture by crinkling it up. The key is to break down the paper fibers so you can begin to pull the individual petals apart. This just gives it life.
Tip: I used the same crinkle it up and break down the paper fibers to add texture to the inside flower too.
2. With Daffodil Delight Ink I stamped a flower from the Beautiful Bunch Stamp Set. You can easily punch it out using the coordinating Fun Flower punch.
Tip: I used the same crinkle it up and break down the paper fibers to add texture to the Beautiful Bunch Stamped Flower too.
3. Clean your Beautiful Bunch Flower and stamp it again using Tangerine Tango and Blackberry Bliss.
Tip: You can cut out the Tangerine Tango middle using the 7/8″ Scalloped Circle Punch and the Blackberry inside can easily be punched out using the 1/2″ circle punch.
4. Begin to layer your flower with your leaves and set aside to add to your card later.
Chevron Textured & Inked Embossing Folder Technique
1. Open your Chevron Embossing Folder and add ink to one side using the Brayer. I would layer on the ink by inking up your brayer and going back over the embossing folder.
Tip: If you get it by accident on the other side of the paper… no worries. You will not see it anyway.
2. Set you paper inside your embossing folder and close it carefully.
Tip: Try not to let the paper move in the embossing folder. If it does you will not be happy with the outcome.
3. Build your Big Shot sandwich and run your inked embossing folder through the Big Shot to add texture and to add the ink.
Tip: Depending on which embossing folder you use and which you’d like inked… the indented edge or the raised portion. Just decide which you’d like to highlight and then ink it up using your brayer.
4. Repeat this process for the (2) 5-1/2″ x 4″ inside Whisper White pieces.
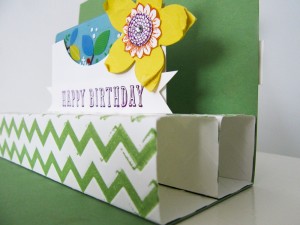 5. Once you texture the (2) inside pieces you’ll need to score them along along the 4″ side… score it at 1″, 2″ and 3″. You want 4 sections each 1″ to bend or mold into your tube… gift card holder.
Gift Card Holder Flower Frenzy Bigz Die
1. Use an 5-1/8″ x 3-5/8″ envelope to make your actual gift card pocket. You can find these envelopes on page 194 of the Stampin’ Up! Annual Catalog. They come with our Note Cards.
Tip: Use a circle punch to clip out the top of your envelope. This gives a fun presentation when opening the card.
2. Seal the envelope.
3. Along the long side or 5-1/8″ side… Cut it at 2″ inches. You can get (2) gift card holders out of one.
Tip: If you want less of the gift card peeking out over the top then you’ll need to cut your envelope at 2-1/8″
4. Open your base… glue the side of the tube that is free against the back or base of the card. Then wrap the tube around and glue the other free end down.
5. Glue or use sticky strip to adhere your gift card holder. Be sure you glue it so that your open end is up.
Tip: I glued the envelope on the tube about 1/4″ from the top.6. Add your other rectangular tube.7. Finish your card by adding embellishments and flowers etc.
Items Include:
Flower Frenzy Bigz Die, Beautiful Bunch Stamp Set, Love, Peace & Cupcake Stamp Set, Tangerine Tango Ink, Blackberry Bliss Ink, Daffodil Delight Ink, Wild Wasabi Ink, 7/8″ Scallop Circle, 1/2″ Circle, Simply Scored, Jewel Rhinestone.
Catalog Request Form
If you are interested in receiving a Stampin’ Up catalog, please fill out the request form below. If you currently have a demonstrator, please ask your current demonstrator for the catalog, because I do have to pay for the catalogs and for shipping. However, if you don’t have a demonstrator and are interested in purchasing Stampin' Up products, I’d love the opportunity to share Stampin’ Up with you, answer any questions and earn your business.


Brandy
I am CASEing this card from you, and I have found out that you can use the 7/8″ scallop punch to do the center of the orange flower.
Linda Thomas
Havelock,NC
I love this idea I’m going to try it tonight thanks for the wonderful ideas and videos… Maxine
I loved this tutorial and can’t wait to try it out myself.
This is very cute. I’ve not tried the distressing of paper that you’ve shown…but will be trying it soon. Thanks for sharing this wonderful variation for a special presentation for a gift card.
Hi Lori,
I’m so glad you are enjoying my tutorials, Yah!!!
I really appreciate you contacting me and subscribing to Brandy’s Cards.
Have a Happy 4th of July,
Brandy
Thanks again great card love the markers I want them all of course!!!
Good Morning Tamera,
I’m so happy to hear you are enjoying my tutorials.
Thank you for taking the time to send me out a kind note.
I love the markers too, they are great!
Happy Stamping
Brandy
Thank you so much your videos are so great Love the gift card so many techniques with this card tank you for sharing your knowledge, your awesome!!!
Love this card, you made it look so easy, a must do. Thanks again
Hey Judy,
You are so nice, I appreciate you sending me a thank you!
I loved making this card and I felt it was worth sharing.
Thank you again,
Brandy
Just love the gift card ! So beautiful. Thank you
Hi Coco,
You are so sweet, thank you Coco!
Have a great day,
Brandy
Brandy, love this card. Looks like a very fun card to make and not at all complicated. Thanks for the inspiration and clever idea.
Hi Brandy,
This is such a great idea for a card!! Love your videos and ideas. Keep then coming.
Brandy, this is such a beautiful card & so many wonderful techniques! I can’t wait to make some of the flowers & of course, the entire card!! Thanks so much for the great video!.
Great video, as always! Thanks so much. I will definitely try this one.
As always, awesome video. I just love watching your videos. Lots of inspiration. Thanks for sharing!
AMAZING!
Brandy you WOW me every time you make cards! You truly are amazing. Thank you for these awesome videos. Please continue to inspire.
Hi Tammy,
I appreciate you and thank you for your kind comment. I love what I do and hope you give the cards a try.
Take care,
Brandy
I love this!!! Thank you so much! will definitely be making this gift card holder at some point!
What a beautiful card. I just love the colors you chose and the embossing folder design was perfect for it. I love giving gift cards and this is such a great idea. Thankyou for sharing. Have a Blessed Day.
Good morning Darlene,
Thank you!
I use the Stampin Up color coach sometimes its a great help.
Thanks again for subscribing and leaving a comment.
Blessings,
Brandy
Fantastic idea for a gift card and great size. Really loved your colors also!!
Brandy another great card, I love this one, It is so pretty and great for any occasion. Love Love Love it. have a wonderful day.
Hey Brandi, love your gift card holder, it is beyond cute. Did you know that the 7/8″ scallop circle punch punches out the center of that flower perfectly? I don’t know about you, but I am always looking for new ways to use my tools.
Hi Holly,
Thank you for the info.
You are great and I appreciate you leaving a kind note.
Have a great day,
Brandy
Wow! Love, love this gift holder. Thank you so much!
Great idea for a gift card holder . Thanks for the video.
Hey Cyndy,
I appreciate you leaving me a comment.
Thanks for subscribing and please come back soon and I welcome suggestions and idea.
Take Care,
Brandy
Love, Love, Love the gift card, its just awesome cute. Your videos are so wonderful to watch and learn new ideas. You are so talented. The Flower Frenzy Die is next on my wish list, its soooo long. Lol!!! Thank your for sharing with us and keep the videos coming.
Hi Brandy,
As always this gift card, card is wonderful.
Thank you so much for sharing this great idea.
I can not wait to try it out.
Great job.
Cyn
Awesome video! I so look forward to your videos, they give me so much inspiration. Thanks for all you do!!
Hey Megan,
you are so sweet, thank you!
I really try to do just that and it is truly my passion and a ministry for me to give inspiration to something I love to do and share.
Thank you for subscribing to Brandys Cards and talk to you soon.
Brandy
WOW! What a beautiful card. I love watching your video’s. You have helped me to make some beautiful cards.
You explaine the steps so well. Thank you for sharing with all of us.
I love this Wonderful gift card card! I am going to pin it so that I can always find directions. You do beautiful work, Brandy. Thanks for sharing!
I enjoyed your video. You always give us some great ideas for cards. Keep up the great work!
All your tutorials are awesome and this one is no exception. I just love this gift card holder. Must try it but need to order Beautiful Bunch Stamp Set first! Thanks for sharing.
Good afternoon Ida,
You will love the Beartiful Bunch Stamp set it is really beautiful and versital.
I would love to see what you come up with when you try it on your own.
Have a wonderful afternoon,
Brandy
Just love the card!!! Think it is just beautiful. You come up with such great ideas. Thanks!
Hope
Lovely card. You rock Brandy woot woot!
Hugs,
Teresa
Fabulous! I like your tip to crinkle the cardstock which breaks down the paper fibers and adds texture. I’ll have to try that. This would be great for Christmas with either the Joyful Christmas poinsettia and the Petals-A-Plenty embossing folder or the Festive Flurry snowflakes and the Snow Burst embossing folder. The holiday sentiments in the Petite Pairs stamp set would be perfect for a Christmas gift card. What do you think?
I really enjoyed your video, the tip about distressing the flowers and I love your card. Our card exchange group has to make a gift card holder card one month and this one would be perfect. Thanks for sharing. When will you be in MI and will you be having a card class?
Beautiful card Brandy! Good job
Hey Brandy ~
Just watch the video on the gift card . Oh my LOVE IT ! I am going to share with my girls .
I have got so many ideas from you . Thank you so much for sharing.
Leigh Ann Crowley
Love, love this gift card holder. I can’t wait to try it. I will have to use my Mixed Bunch stamp set instead of the Beautiful Bunch for now.
Thank you so much for showing how to make it.
Jackie
this is over the edge beautiful!! your tutorials are so well done & I haven’t missed any!